Saturday, December 5, 2015

Let's Get Sketchy/Picture This "One Word" blog hop

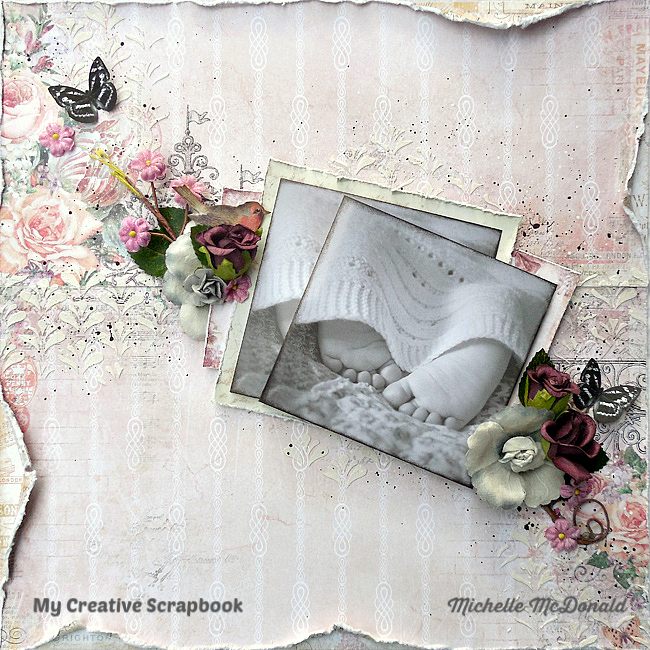
Welcome to the Lets Get Sketchy/Picture This “One Word” Blog Hop.  You should have come from Joefil's blog. If you have stumbled across this by chance and want to play along then you can head back to the Let's Get Sketchy site to start at the beginning and to start collecting your challenge words. These words should be bolded on each DT member’s blog.
I chose the word "Faith" for my project. I created my layout using Blue Fern Studios papers along with a few scraps, pieces of Blue Fern chipboard, gesso, and misc. flowers and trinkets. On the background I added a little more texture and interest with random stamping and stenciling with modeling paste. Finishing it off with some splatters of acrylic paint in black and white.
Remember to play along in our hop challenge to win the wonderful prize from our sponsor, Creative Embellishments! My word is Knowing. Up next on the hop is Masami, make sure you hop over to the blog to check out her wonderful inspiration she has for you. Don't forget each team member has a hidden word somewhere on their page. Please grab all the words for your chance at an extra prize!

Tuesday, November 10, 2015

Sketch reveal for LGS

Hey everyone! It's time for a new sketch reveal at Let's Get Sketchy and I have my page based off the sketch to share with you. 
I used a mix of papers from Blue Fern Studios and Prima, as well as a few pieces from a Finnabair ephemera pack. On the background I've done a bit of stenciling, paint splatters, and a few dabs of gesso. After adhering all my layers under the photo together I mounted them on thin cardboard for dimension. For the chipboard swirl I lightly coated it with gesso, once dried I simply inked it a light pink and gave a couple random spots a touch of gold embossing. After all the embellishing was in place I gave the clusters a few dabs of gesso with a sponge to tie it all together.
Here are a few close ups of the details.
And here's our fabulous sketch this week.
Now it's your turn! I can't wait to see your takes on the sketch. 
Thanks so much for coming by! Hope you have an awesome day!

Sunday, November 8, 2015

Beautiful Dream for Reneabouquets

Hey there all!  Hope everyone has enjoyed their weekend so far. Today I'd love to share my latest creation for Reneabouquets Etsy and Reneabouquets.com, where you can find all the perfect touches to your crafting projects.
 I started with some papers from the BoBunny Madeline range. I distressed and/or tore the edges of my layers, then adhered them together and mounted them on a thin piece of cardboard for a little more dimension.And then the photo was mounted on thin cardboard as well so that I could tuck a few embellishments under easily. In my embellishment clusters I added a few pinches of  glitter glass in Patina for added texture and interest. After I punched a decorative border near the top and randomly stamped just a bit on the background I added  more texture using a TH layering stencil and some texture paste. Once everything was in place I added a few flatback pearls to the stenciled areas. Here are closies of the details.
My supply list with direct links from Reneabouquets:
Prima Glittered Roses- Aquas

Thanks so very much for dropping in! Hope you have a creative day!


Reveal time at My Creative Scrapbook


It's time to reveal the November kits at My Creative Scrapbook! Gratitude, fall, family, friendship, and love are plentiful with the selection of kits we have available this month. Each kit is packed full of beautiful designer papers and coordinating embellishments. Here are three of my projects that I created using the gorgeous Nov. Limited Edition kit which featuring beautiful papers from Blue Fern Studios, Marion Smith, and WRMK, with Prima flowers, ephemera pack, and stencil.


Here's our November LE kit.
My Creative Scrapbook is accepting new members. You can find all the details here.
Thanks so much for coming by! Hope you have a creative day!

Monday, October 26, 2015

Perfect for LGS

Happy Monday everyone! It's time for a new sketch reveal at Let's Get Sketchy and I have my inspiration page to share with you.
It's a quick and  easy page that I created. Not all my layers ended up as tilted as the sketch, but I'm happy with the end result. For this page I started by distressing my layers, stamping randomly, and then adding splatters to the background. I mounted the photo mat layers on a regular piece of cardboard for dimension, then mounted the photo on a thin piece of cardboard before adhering it to the page. Once the embellishments were in place I covered the photo and gave the page a few more splatters of the acrylic paint in black and banana cream.
And here's this week's sketch that I turned for my page.
Now it's your turn! Thanks so much for coming by! Hope you have a creative day!

Tuesday, October 20, 2015

Wake Me for the Witching Hour *Reneabouquets*


For this page I used a mix of papers from MME and Carta Bella. On the Carta Bella polka dot paper I trimmed off the side and bottom one inch each side, then inked the edges with Black Soot distress ink, distressing the edges in a few random spots with the Prima distress tool. Next I stamped in some random areas, adding more texture with a Prima stencil and texture paste, then added some splatters of acrylic paint in white and burnt orange. Once it dried, I matted the polka dot paper onto cardboard before adhering it to the MME paper for dimension, then added the clock face overlay. I mounted the cute photo on a thin piece of cardboard before adding layers underneath. After I had the layers together I mounted them on a piece of cardboard. Lots of dimension happening on this page lol
After I adhered the layers I added a couple of the beautiful Witch's Brew butterflies and the Victorian Days lace to the layers.
Once I had all the embellishment clusters in place I added the Microbeads to random spots and a few more splatters for a finishing touch.
My supply list from Reneabouquets Etsy:


Thanks so very much for stopping in and letting me share with you today! Hope you have a delightful day!

Thursday, October 15, 2015

Family for Picture This

Hey there all! It's time for the mid month challenge reveal at Picture This! The new criteria for this challenge is to create a project using: 2 photos + Polka dots + family
Here's what I created following the criteria.
For this page I used some older Prima papers that I had stashed from the Rondelle collection. I started the background by cutting the page along the newsprint at the bottom and fussy cutting around the flowers. Then I mounted the two halves onto a piece of plain cardstock, leaving the cut edge unglued so that I could tuck a couple strips of torn patterned paper in. To add interest I stamped around where my design was going then added some texture using a bubble stencil and modeling paste. Once the paste dried I traced a few of them using a black thin marker. Next I added splatters of acrylic paint in black and white. Then I started adding the layers that were going under the photos (mounted on thin cardboard and tucked under the fussy cut flowers). I inked the edges of my photos black and mounted each one on thin cardboard before placing them on top of the layers for a touch of definition and dimension. Once the embellishments were in place I gave the page a few more light splatters as a finishing touch.
Now it's your turn and I can't wait to see what you create! Thanks for dropping in! Hope you have an awesome day!

My Creative Scrapbook reveal #2

Hey there everyone! Today I'd love to share the second half of the projects I created for My Creative Scrapbook using the gorgeous October Limited Edition kit.
 This kit features Autumn Anthology papers from Blue Fern Studios and beautiful Prima flowers. For this age I gave the background a thin coat of clear gesso. After it dried I added a bit of texture and interest by stamping, using a stencil and modeling paste, and then I added plenty of little splatters.For the chipboard piece I simply gave it a pretty thick coat of gesso, and while it was still wet sprinkled some seed beads onto it. I adhered my layers together and mounted them on cardboard. After all the embellishments were in place I added some TA English Ivy spray here and there, then cover the photo and gave the page a bit more splatters.

And for the last page I created using this kit I made a video that you can view here:

Thanks so much for coming by and letting me share with you! Hope you have a creative day!

Saturday, October 10, 2015

Little Witch for Reneabouquets

Hey there all! Today I'd love to share my latest page I created featuring products from Reneabouquets.com and Reneabouquets Etsy. Where you can find the perfect little extras for your fall and Halloween projects. 
For this page I used a mix of papers from My Mind's Eye and Bo Bunny. I started by distressing all the edges on my layers. For additional texture I mixed some texture paste with acrylic paint in khaki to get the color I needed, then spread it through the TH Gothic stencil. I added a lot of upcycled pieces in my layers under the cute photo, adding more texture with the tulle and lace. After adding the embellishment clusters around the photo I tucked in a couple of the beautiful the Witch's Brew butterflies from Reneabouquets.
And here's a closer look at the Witch's Brew butterflies. I love the spider webs on the wings, don't you?
Here are the Reneabouquet supplies I used for this page with  direct links.

Thanks so much for dropping in and letting me share with you! I truly appreciate you!

My Creative Scrapbook Reveal

Fall, family, friendship, and love are in the air with our selection of kits this month, and we are so excited to show you! These kits are packed with beautiful designer papers and tons of coordinating embellishments. They are so fun and easy to create with. Today I have a couple of pages that I created using the Limited Edition kit to share with you. I absolutely loved working with the "Autumn Anthology" papers from Blue Fern Studios in this month's kit. They work so well with any theme.
 And my second layout.

Here's a look at the October Limited Edition kit.
My Creative Scrapbook is currently accepting new members. Subscription info can be found here.
Thanks so much for stopping by!

Tuesday, September 1, 2015

For Reneabouquets

Good morning all! Today I have another page to share that I created featuring goodies from Reneabouquets.com and Reneabouquets Etsy
I started my background by adding texture with some Ranger texture paste and two stencils. Then added my photo and distressed layers underneath. After adding all the wonderful embellishments from Renea's shops I finished the page off with just a few splatters of  Tattered Angels' Pink Bubble Gum and white acrylic paint,
 I sprinkled a bit of the glitter glass throughout the clusters for that added touch of detail and texture.
 I think these gorgeous butterflies compliment the paper and match the flowers, tying the page together beautifully.
My supply list:

Thanks so much for stopping by and letting me share this page with you!
Hope you have a creative day!

Wednesday, August 26, 2015

Your Day for Reneabouquets

Good morning everyone! Today I'd love to share a layout with you that I created featuring some more goodies from Reneabouquets Etsy and Reneabouquets.com and I'll post the direct links at the bottom.
For this page I used Prima's Debutante collection. I started my background work with a bit of random stamping using three different stamps and black ink. Then I added more texture using texture paste and two different stencils, adding a few random pearls when it dried. Next I added some splatters of black acrylic paint and the Prima Color Bloom spray in Cotton Candy. I distressed/ fussy cut the layers under the photo and mounted them on thin cardboard for a little more dimension. Finally adding all the wonderful embellishments, which is my favorite part of  creating any page. And as a final touch I splattered a bit more of the Cotton Candy Color Bloom spray.
Here are a few close-ups of the details.
I love those Emmie's Dream butterflies. They are so gorgeous and one of my favorites.
And here's my supply list:

Thanks so much for coming by! Hope you have an amazing day!


Saturday, August 22, 2015

Special Moments for Reneabouquets

Hello all and happy Saturday! I hope you are getting to enjoy your weekend so far. Today I'd love to share one of my layouts that I recently created using goodies from Reneabouquets Etsy shop and Reneabouquets.com
 I started my page with a mixture of Prima papers, distressing and punching the edges. After stamping on the background I decided to add more texture using two different stencils and some texture paste. Once it dried I added more detail by tracing random dots with a black micro marker. I mounted the photo on a thin piece of cardboard as well as the layers under it for dimension and to make tucking a few goodies a bit easier.
 I thought the Prima bunny resins were a perfect touch for the sweet photo. And the Salted Caramel butterflies really helped pull the rich earth tones from the photo and other embellishments.
And here's my supply list with the direct links:
Reneabouquets Trim- Natural Cotton Crochet Cluny lace
Petaloo Botanica Collection- Faux Dried Flowers

Thanks so much for taking the time and letting me share you you today. I truly appreciate it. Hope you have a creative day!

Monday, August 3, 2015

August Sneak Peeks for My Creative Scrapbook are here!

It's SNEAK PEEK time!

Oh do we have some exciting kits for you for August!  There are only a few days to go until we can reveal them all to you.  In the meantime, we're thrilled to share a few peeks at what Pam and the team have been up to with the August kits!
Our August Main kit sneak peeks:

Our August Creative kit sneak peeks:

Our August Limited Edition kit sneak peeks:

Now that you have a peek at what's coming, don't forget to reserve your kits :)
Please visit My Creative Scrapbook for more information.